Thursday 25 October 2012

How to Configure FTP Server?

How to Configure FTP Server

To Configure FTP Server, FTP service should be install on Local Computer , And user must be member of the Administrative Group on the local computer . With the Help of FTP server we can share any file or folder with in a network.
Installation of FTP service

1. Click on start Button , then Click on Control Panel, then Click on Program and Features
2. In Program and Feature window Click on Turn Windows Feature on or Off.
3. Expand Internet Information service Node .
4. Expand FTP server, then select FTP service Check-box, then click on Ok.
5. Now Go to the Control panel, then Click on Administrative tool.
5. Click on  IIS manager, Click the Connection pane.
6. Right click on the Site, then Click on Add FTP sites.


7. In the Add FTP wizard , Write the name of FTP site  and Select the Path of Folder which you want to share, then 8.  Enter the Loopback address(127.0.0.1) in IP address Box, and Port 21. then click ok.


8. Go to IIS and click on the created Sites , the Content of the site will be display.

How to connect shared printer in network with other computer?

Connect Printer in Network with other Computer in windows XP

1.  Click on Start button , then click on Control panel, Then click on Printer and Fax and Click on Add printer then Next
      Or 
Click on Start button , Then Click on Run option , then Type Control printers , then click on Add printer then Next
2. Select A network printer or a Printer , or a printer attached to another computer option, then click on Next
3. Select Connect to this printer option


And Type Printer name in this format
\\Printserver-name\share-       name

Such as \\printserver\HP
4. Then search printer in the network . then click Next, then click on shared printer
   then lick on Finish

How to share Printer in Window XP?

Sharing Printer with other computer in win XP


To share Printer Step by step in network


Step1-: Click on Start button -> Control panel ->Printer and Hardware, then select Printer and   Faxes
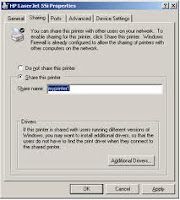
Step2-: Right-click on Printer which want to share,   then click on Sharing


Step3-: Click in Sharing tab, then select share this printer-> Type share name of the Printer


Step-: Click on apply then ok

Tuesday 2 October 2012

Secure your wireless network

 
The convenience of having a wireless network in your home comes with added security risks. If it isn’t secured properly you are vulnerable to someone using it to get to your information or to hijack your connection or computer for their own purposes.
You could be held liable if someone uses your internet connection, as any illegal activity will be linked back to your ISP account.
Having an unsecured wireless network can allow anyone within range—your neighbours or anyone on the street—to access your network or use your internet connection. They could use up your download allowance (possibly resulting in excess usage fees), intercept and read your files or email or, more seriously, use your account to access illegal content or undertake criminal activities.

Top tips

  • Restrict access so only you (or anyone you allow) can use your wireless network. Set up your WiFi so that only specific computers or devices can access the network.
  • Change the default SSID and administrator username and password on your wireless device. Set a separate password on the wireless device so only you can change the security settings.
  • If you use a wireless router make sure the firewall on this device is turned on. You should also have a firewall on each computer to monitor information going in and out and block unauthorised activity. Read more on firewalls.
  • Turn off your SSID broadcast. This will make your network much harder to discover.
  • Make sure you have encryption turned on. Choose the strongest encryption option available.
  • Turn off your computer and disconnect from the internet when not in use. A hacker cannot attack your computer if it is turned off or disconnected from the internet.

What is a wireless (WiFi) network

Many of the latest computers come with the ability to connect to the internet and other nearby computers without the need for wires or cables, using a wireless connection. Instead of wires or fibre-optic cable, wireless technology uses radio waves to transmit the data in a way similar to a mobile phone or radio.
A wireless network uses a transmitter (wireless router or access point) that is hardwired to an internet connection. The access point acts as a gateway to connect your computer to other computers on your network and out to the Internet.
The access point makes itself known to other wireless devices (like the wireless card in your computer) by broadcasting an identification number (SSID). Computers that have a wireless card and have permission to access the wireless frequency can use this connection.
Because wireless networks do not require a wire between a computer and the internet connection, it is possible for anyone within range to intercept the signal if it is unprotected.

Secure your wireless network

If you use a wireless network:
  • change the default SSID and administration username and password
  • turn off your SSID broadcast
  • turn encryption on and use the strongest encryption option available
  • restrict access so that only specific computers or devices can access the network
  • turn off remote access.
  • turn off your wireless connection when you are not using it.

Change the default SSID and administration username and password

Wireless hardware and software usually comes with a default digital name—your service set identification number (SSID)—and default administration username and password set by the manufacturer. These are standard names and passwords that any person with the intention of accessing your wireless connection is likely to know.
Change the SSID, if you can, to something unique (that doesn’t include the brand name of the router) and set a strong administration password on your wireless network.  Read more about creating strong passwords.

Turn off your SSID broadcast

By default your wireless access point will broadcast its SSID. This makes it easy for any devices nearby to see the network and while it makes it easier for you to connect it also makes it easier for other people to find and connect to it as well.
Hide your network by turning off the SSID broadcast. You can manually enter the SSID into any device you want to connect. You will only have to do this once.

Turn encryption on and use the strongest encryption option available

Encryption scrambles information according to a particular formula making it very hard for anyone to make sense of your transmitted data if they manage to intercept it.
Make sure you have encryption turned on and choose the strongest encryption option available. WEP offers the most basic protection and should only be used if there are no other options available, such as WPA or WPA2.
Read more in our factsheet on Wireless (Wi-Fi) security (PDF, 478KB).

Restrict access so that only specific computers or devices can access the network

You should restrict access to your wireless network to specific computers that you nominate.
Every computer connected to your network uses a network adaptor, each one of which has a unique 12-digit identifier called a MAC (Media Access Control) address. To give specific computers permission to use your network, you'll need to add their MAC addresses to the wireless network through the wireless software settings. The MAC address of a computer can sometimes be found on a sticker attached to the computer. Alternatively, most wireless routers can tell you the MAC address of the computers connecting to them.

Reduce the power of your transmission

Some wireless access points allow you to reduce the power of your transmission and thus reduce the distance that the signal carries. Although it's usually impossible to fine-tune a signal so precisely that it won't reach outside your home, you can often limit how far outside your premises the signal reaches. Be mindful that if you adjust the power of your wireless connection if may adversely affect the performance of your connection.

Turn off remote access

Turn off any feature your hardware may have that allows you to give administration access to someone off-site, e.g. an administrator who might be anywhere on the internet, such as the person who looks after your computers.

Turn off the connection

Turn off your wireless connection when you are not using it.

Monday 1 October 2012

Change Ip address with batch file

My boss having Laptop & he having different IP address at office & 

home, & every day when he comes to office he need to change his 

laptop IP adress everyday. So i written a batch script to change IP 

address with single click, & i know this problem is with many people 

so i am sharing this batch script with you...

OK let's starting creating batch file

Copy the code below :


@echo off 
echo Choose: 
echo [A] Set Static IP.  
echo [B] Set Obtain adress automatically.
echo. 
:choice 
SET /P C=[A,B]? 
for %%? in (A) do if /I "%C%"=="%%?" goto A 
for %%? in (B) do if /I "%C%"=="%%?" goto B 
goto choice 

:A 
echo "Setting Static Ip" 
netsh interface ip set address "Local Area Connection" static 172.16.0.6 255.255.0.0 %D_Gate% 172.16.0.100
netsh int ip set dns "Local Area Connection" static 123.123.123.123
netsh int ip add dns "Local Area Connection" 124.124.124.124 
netsh int ip show config 
pause 
goto end

:B 
@ECHO OFF 
ECHO Resetting IP Address and Subnet Mask For DHCP 
netsh int ip set address name = "Local Area Connection" source = dhcp
netsh int ip set dns name = "Local Area Connection" source = dhcp
ipconfig /renew

ECHO Here are the new settings for %computername%: 
netsh int ip show config

pause 
goto end 
:end
echo Visit Askmetricks.blogspot.com
pause


Now paste the code into Notepad & save it as IP changer.bat

Very Important instruction :-

in this batch script i had defined my ip address ,DNS ,Default 

gateway & Subnet mask.

but you need to replace as per your network settings....

What to change ?

172.16.0.6   is my IP address

255.255.0.0  is my Subnet mask

172.16.0.100  is my Default gateway

123.123.123.123 is my Primary DNS

124.124.124.124  is my Secondary DNS

Replace all above addresses with your network addresses & save the 

file

How to Shrink System partition in Windows 7


The system partition (meaning the partition on which the operating system is installed on) is a place that just begs for more space as time goes by. In most cases, proper design before the installation of the operating system will prevent you from having to extend that system partition (read more about it in article on how to extend the system partition in Windows 7)


Previous Microsoft operating systems had some internal mechanism to shrink partitions. But there were limitations on these operations. Some 3rd-party applications could (and still can) be used to extend partitions, but in this article, like the one mentioned above, we want to focus on internal tools.

Windows 7 allows for an easy, out-of-the-box, method of shrinking partitions (any partition, including the system partition) and making them smaller.

2 Ways to Complete this task

1. Shrink with GUI interface:

1. Log on as an Administrator.

2. Go to Control Panel > System and Maintenance > Administrative Tools > Computer Management. You can also open the Computer Management application by using the Computer context menu. Select Computer Management.


In fact, you can go directly to the Disk Management MMC snap-in by typing diskmgmt.msc in the Start's search box or on the Run command.


If you're prompted for an administrator password or confirmation, type the password or provide confirmation.
3. Expand the Storage section, and in it go to the Disk Management console.


4. Select the disk you want to shrink, for example Drive C.
5. Right-click the disk and select Shrink Volume.


6. Process will take a few moments, while the system is looking at the partition structure. Note that it would be best to make sure that that partition was properly defragmented prior to trying to shrink it.


7. When calculation is done, the UI will display the largest amount of space that can be trimmed from the selected partition. Please note, again, that this size is related to the actual amount of free space on that partition (i.e. you cannot shrink more that there is free space), and the amount of file fragmentation on that partition.


Enter the amount in MB and click on the Shrink button.


8. The process will finish quite quickly, and a reboot is NOT required. You can notice the new partition size. Also note that you now have a remaining unused part on the hard drive.


Related:

2. Shrink with Command line interface: 

Extending a partition or volume can be done via the CLI, or command line interface. In order to do that perform the following steps:
1. Click Start and type CMD, then press Enter. It is best to run the Command Prompt as an Administrator. To do so, right-click CMD and select "Run as Administrator".
BTW, you can also hover over the CMD line and press CTRL + SHIFT + ENTER to invoke the "Run as Administrator" shortcut.
2. In the command prompt type
Diskpart
3. Select the right disk drive and partition to work on. Typically, in Windows 7, this should be disk 0 and partition 2, but please make sure you do select the right disk and partition before continuing. You can do so by performing a LIST operation to view your existing disks and partitions BEFORE attempting to expand the wrong partition.
List disk
Select disk 0
List partition
Select partition 2


4. When the right disk and partitions were selected, run the SHRINK command which reduces the size of the volume with focus by the specified amount, and makes free disk space available from unused space at the end of the volume.
SHRINK has some parameters we need to talk about:
DESIRED=<N> - Specifies the desired amount of space in megabytes (MB) to reduce the size of the volume by. If a desired amount is not specified, the volume will be reduced by the maximum amount of free space available on the volume.
MINIMUM=<N> - Specifies the minimum amount of space in MB to reduce the size of the volume by.
QUERYMAX - Returns the maximum number of bytes that the volume can be reduced by (the free space available on the volume). This value may change if applications are currently accessing the volume.
If a MINIMUM amount is not specified, the volume will be reduced by either the DESIRED amount (if specified), or by the maximum amount of free space available on the volume. If a MINIMUM amount is specified but not enough free space is available, the command will fail. This command works on basic volumes, and on simple or spanned dynamic volumes. You can reduce the size of a volume only if it is formatted using the NTFS file system or if it does not have a file system.

For example:
Shrink QUERYMAX
The above command will return the maximum number of bytes that the volume can be reduced.


shrink DESIRED=500 MINIMUM=250
Will shrink the partition by 500 MB, if possible, and if it cannot shrink by 500 MB, it will at least attempt to shrink it by 250 MB.
shrink DESIRED=10000
Will shrink the partition by 10000 MB.


5. You may check the new partition size by running the list command, again.
List partition


6. You must now exit DISKPART by using the Exit command.
Exit
BTW, as a general tip and so that you know, you can use the above procedures also on Windows Vista, Windows Server 2008 and Windows Server 2008 R2.

How to Setup Voice Recognition in Windows 7

Speech Recognition technology allows you to control your computer by speaking. When you talk, the software will intelligently decide whether to convert your voice into text, such as to allow you to dictate documents and e-mails, or whether you have given a command that requires it to take an action.

How to Setting Up in WIndows 7
  1. Plug-in your microphone.
  2. Click Start
  3. Search for “speech recognition” and click on Windows Speech Recognition
  4. If this is your first time using Speech Recognition (it likely is, since you’re reading this), a Microphone Setup Wizard will pop-up, asking you to do some stuff
  image
  1.  Follow the instructions, and after your microphone is set up.

    Warning:
    This might take 15 mins – 30 mins. But if you’re new to this, don’t worry, Windows will walk you though.
  2. Try to pay attention during the tutorial, it’ll tell you everything you need to use Window’s Inbuilt Features
  3. After you’re done the tutorial, just click the microphone on the Windows Speech Recognition Bar, and watch the Microphone button glow blue. Now you’re ready to speak… to your computer!

image
That’s all there is to it. A few words of caution though:
  • Dictating to your computer might sound easy, but you’re computer certainly isn’t a human, and chances are that it will only understand you most of the time, missing difficult to interpret words.
  • Be careful when you are talking to someone else and your microphone is turned on.
  • I find that composing your dictation in a program such as Wordpad or Microsoft Word is better than composing in a program like outlook or in a web browser.  You can compose things in Wordpad and then just copy and paste them wherever you want.
  • Make sure you use the correct command instead of typing things on your own, windows learn from it and become better.